Showing posts with label food. Show all posts

Dec 24, 2016

How to make Korean Seafood Pancake

Bitten by the k-bug? Well... not sure about you, but I sure am... Nua-ing at home and binge-watching "Goblin"~

To complete the whole package, I tried making Korean pancakes too! I am a total fan of their pancakes. It's a side I always order when I eat at Korean restaurants.

Nope, you don't need to buy Korean pancake flour to make this dish. Adapting from Nami's recipe, we will use cake flour instead.


Ingredients needed

  • 5-6 prawns
  • 1/2 sotong in thin slices
  • 2 sausages in thin slices
  • 5-6 stalks of green onion, cut into half of its length
  • 4 crabmeat sticks in slices
  • 1 egg
  • 1/2 cup & 1 tablespoon of cake flour
  • 1/2 cup of cold water
  • 1 teaspoon of light soya sauce
  • 1 tablespoon of abalone sauce
  • 1 teaspoon of honey
  • Pepper
  • Oil


Method
1. De-vein and slice the prawns into halves.

TIP
This makes the prawns less thick, hence a thinner and crispier pancake.

2. Marinate the prawns in a mixture of light soya sauce, abalone sauce, honey and pepper.

TIP
This marination mixture can be customised to your liking. You can change abalone sauce to oyster sauce, or add/ reduce any of the ingredients or the quantities.

3. Oil the pan. Heat up the pan.
4. Once the pan is ready, add the green onions.

TIP
I didn't lay out the green onions neatly as Nami did. Instead to ensure that the ingredients help the pancake stick together, I carefully laid out the other ingredients, like prawns, sotong, sausages and crabmeat sticks. I ensured that the ingredients are kinda of interlinked with each other.

5. Add prawns, sotong, sausages and crabmeat sticks.

6. Mix cake flour with cold water. Nami warned about overmixing batter creates gluten, so do not whisk it too much.

7. When the prawns turn reddish, add in the batter, bit by bit, ensuring that it covers all the ingredients in the pan.

8. Beat the egg. Add in pepper for taste. Mix it well.

9. Leave the pancake for 3 minutes, add in the egg, bit by bit, ensuring that it covers most of the pancake area.

10. Leave the pancake for another 3-5 minutes. Check that the bottom is not burnt.

11. Flip it over. This is the hard part. (>_<)

12. Flatten it. Leave it for another 3-5 minutes.

13. Flip it again, if required, for another 2-3 minutes.

14. Serve it hot. Tastes good with chilli sauce.

Well.. I tried making it four times already... and I am still learning how to flip it perfectly. There is only that one time that I managed to flip it perfectly out of the multiple flips, without tearing it into halves. Orz

Hope you do better than me! Taste-wise, I am quite confident though :)

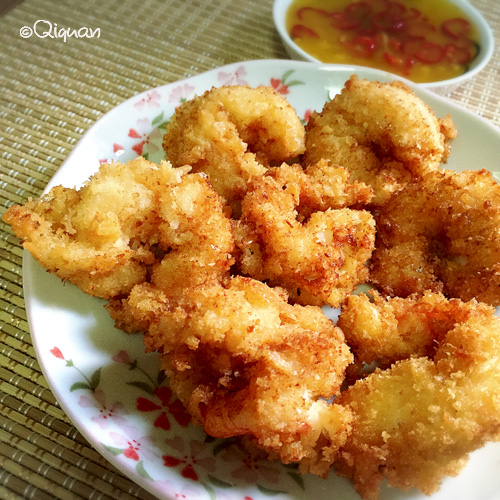
How to make Deep Fried Coconut Shrimps

Bookmarked this recipe from Tastemade for ages, and finally I had time to try it! Presenting you the deep fried coconut shrimps. Tasty looking shrimps enveloped in the fragrance of coconut. Delicious~


Here's how I made it. I made some adjustments to the recipe.

Ingredients needed

  • 10-12 shrimps
  • 2 eggs
  • 1/2 cup of all-purpose flour
  • 1/2 cup of beer
  • 1 tablespoon of light soya sauce
  • Pepper
  • Oil
  • 1 cup of breadcrumps/ panko
  • 1 cup of shredded coconut


Method
1. De-vein and butterfly the shrimps.

TIP
You can leave the tail tip on for better presentation.

2. Marinade the shrimps in light soya sauce and pepper.

TIP
You can change the marination ingredients to a combination of oyster sauce, pepper, cooking sake and/ or light soya sauce.

3. Mix flour, beer and eggs in one bowl. [Bowl A]
4. Mix breadcrumps and shredded coconut in another bowl. [Bowl B]
5. Heat up the oil.

TIP
To test that the temperature is right, you can drop a bit of the batter in the oil. If it crisps immediately and floats, it is ready.

6. Coat the shrimps one by one with batter in Bowl A and then with crumbs in Bowl B, then deep fry it in the oil.
7. When it turns golden brown, it is ready to serve.

Surprisingly it stays crispy and fragrant even after an hour or so :)

There you go, hope you enjoy these shrimps as much as I do.

Oct 16, 2016

How to make Honey Baked Chicken Wings

QQ is back from her hiatus. I'm now a proud owner of an oven~ I will be exploring different dishes using my oven every weekend. *keeping fingers crossed.* Well, there are hits and misses, so I will only share the "hits" with everyone. So far, I have tried baking honey baked chicken wings, potato chips, egg tarts and Chinese-style roast pork. I still have a long list of food that I want to try baking! Gambarimasu!

Now sharing with everyone, my first hit with my new toy-- Honey Baked Chicken Wings.


Ingredients needed

  • 16-18 Chicken Wings
  • 2 tablespoons of Manuka Honey or 6 tablespoons of Honey
  • 3 tablespoons of Oyster Sauce
  • 2 teaspoons of Sesame Oil
  • 0.5 teaspoon of Light Soy Sauce
  • 2 teaspoons of Chinese Cooking Wine


Method
1. Mix all the ingredients in a bowl.
2. Marinate the chicken wings and leave the mixture overnight in the refrigerator.
3. Preheat oven to 220*C.
4. Place the chicken wings on the grills.

TIP
Coat the tray with aluminium foil and place it at the bottom of oven, to collect dripping sauces and oil.
-QQ learnt this the hard way-

5. Bake the chicken wings at top 1/3 of the oven.
6. Bake for about 15 minutes.
7. Lower the temperature to 180*C and bake for another 15 minutes.

TIP
You may adjust the timing according. Do check the colour of the chicken skin. When it is slightly brown and charred, it's ready.

And there you go, a very fuss-free oven dish. Perfect for potluck parties~

Sep 14, 2015

Makan Time at Kanda Wadatsumi ~ Shizuoka Special

Unagi, mikan, tomato, green tea, wasabi.... ah and unagi pie with ice-cream! *Drools*


If you are craving for Shizuoka food like me~ you should head down to Kanda Wadatsumi! From now to 26 September 2015, they will be offering authentic Japanese cuisine, with airflown produce from the Shizuoka prefecture.

They don't offer unagi pie dessert yet though. You can get the unagi pie goodness at Shunkado Unagi Pie Factory (Japanese)/ (English).

Thanks to the Shizuoka Prefectural Office based in Singapore, I get to try the dishes first-hand together with other lucky invited guests :)

First, let me introduce to you the most salmon-alike dish:


Don't they look like salmon sashimi? The texture is very similar, but the taste is less fishy. Guess what fish is this? It's the rainbow trout. They are farmed at Fujinomiya, the land of Mt Fuji. Therefore, the water used to breed them are all from Mt. Fuji. I highly recommend this to you if you usually don't take fish sashimi as you can't really stand the fishy taste. Enjoy the same goodness minus the fishiness.

Next introducing you to my most favourite dish of the day is the Deep Fried Rainbow Trout with Seaweed Glaze~


The seaweed glaze blends perfectly well with the deep fried rainbow trout. Wonder how they concoct the sauce?

My next recommendation is Shizuoka's tomato! Known as Amela Tomatoes, they are no ordinary tomatoes. To me, they are more like fruits, you know like melons, strawberries, and not vegetables, as you can just eat them on their own. It oozes sweetness. They are so famous for their sweetness locally (in Japan) that they appeared on TV programmes. That's how I came across them in the supermarket. Usually I just buy the cheapest to save up for domestic travel. From then I was a converted Amela Tomato fan. I missed Shizuoka's tomatoes terribly since I left Japan. Singapore doesn't (has yet...) import tomatoes from Shizuoka. But I heard the exporter is now working with suppliers to bring in tomatoes~


Once they are in, I can't wait to make this snack:
1. Slice tomatoes (not entirely)
2. Cut preserved plums into strips
3. Put a slice of preserved plum into the cut tomato such that it now forms the tomato-plum sandwich!
4. Refrigerate and serve cold

Probably lesser known to all gaijins, like us, one of Shizuoka many produces includes tuna. Try the Seared Albacore Salad, whereby albacore is a type of tuna:


This... you may have known. Shizuoka in particular Izu area is famous for sakura shrimp. I think the popularity of sakura shrimp is picking up in Singapore food scene. Now sakura shrimp sushi, etc, are more commonly available.


Sakura Shrimp Sushi from Ryoshi Sushi Ikeikemaru. Ryoshi Sushi imports sakura shrimp from Numazu (which is in Izu).

At the food tasting session, we tried Sakura Shrimp Claypot Rice.


It tastes a bit dry for me...

But I love the Sakura Shrimp Tempura with Assorted Vegetables. Sakura Shrimp goes very well with tempura vegetables. I would like to try remaking this dish at home!


And of course, you have to end it with melons as desserts!

Introducing you the Musk Melon of Shizuoka, known as Lion Melons. They easily cost twice and thrice the price in Singapore. So I will always handcarry one when I am in Shizuoka Prefecture~ Their melons are juicy sweet, and their skin is thinner than our tropical melons, so you get more melon meat, more juice, and more sweetness. I once had a melon for 2 dinners. That's how satisfying it was. :P (those were the days, when I lived alone in Hamamatsu.)


They offer Lion Melons in Kanda Wadatsumi too~ Go try it!

Bon Appetit~

How to get there?
Kanda Wadatsumi
50 Tras Street
Singapore 078989


Nearest MRT station: Tanjong Pagar Station
Nearest MRT exit: A

Kanda Wadatsumi holds various food fairs depending on seasons, as they are strongly supported by the Zengyoren Japan Fisheries Association, which represents all coastal fishermen in Japan. Do check their website/ facebook page for promotions!

May 10, 2015

How to make Pan-fried Scallops with Crispy Toppings

While queuing to take photographs with Rie Fu (Japanese singer who sings many famous anime songs, including Gundam Seed Destiny, Bleach etc), ah.. I sidetracked... anyway, while queuing up, I saw this video which is on loop in the JCC Library. It is a cooking programme sponsored by Ministry of Agriculture, Forestry and Fisheries (Japan) [MAFF, for short], which shows how we can whip up many simple yet delectable dishes using Japanese agricultural and fishery produce.

And I was deeply attracted to the Herb Roasted Scallops recipe by MFAA. That led me to buy scallops from the supermarket on my way home, and the rest is history... tada...


Sidetrack: Most of my images hosted on this blog are linked via my facebook albums... so when facebook decides to change the links, my images get de-linked... :( Pardon for the disappearance of my images.. It will take time to restore them...

Based on the available ingredients & equipment (or lack-of, I do not have any oven) at home, I combined Gordon Ramsay's recipe with MAFF's recipe, to create the above Pan-fried Scallops with Crispy Toppings.

Here's how I did it:

Ingredients needed

  • Scallops
  • Cooking oil
  • Pepper
  • Salt
  • Butter
  • 1/2 clove of garlic, chopped
  • Wholemeal Cracker Crumbs ( 2 - 3 crackers)
  • Chopped Spring Onions
  • Parsley

TIP
The original recipe uses breadcrumbs. As I did not have breadcrumbs at home, I substituted with wholemeal cracker, which I pounded to make crumbs.

Method

Scallops
1. Season the scallops with salt and pepper.

2. Heat up the frying pan. Ensure that it is hot.

3. Add cooking oil.

4. When the cooking oil is heated, add the scallops in clockwise directions. Pan-fry each side for about 1.5 to 2 minutes.

Watch the video below for Gordon Ramsay's instructions:


Toppings
1. Melt the butter in the frying pan.

2. Add the chopped spring onions and garlic.

3. Add pepper for seasoning.

4. Add the wholemeal cracker crumbs. Stir and mix well.

To Serve
1. Add the toppings on the scallops. Add parlsey as garnishing to serve.

There you go~ Pan-fried Scallops with Crispy Toppings.

I will try with breadcrumbs the next time.

Hope you like this dish!

Dec 19, 2014

How to make Carbonara Pasta

If you would like to try making the carbonara pasta from scratch and not from using the readymade sauce sold at supermarkets, then do try out this recipe. This recipe is based on the Creamy Bacon Carbonara recipe from The Recipe Critic.

I always make carbonara pasta after making the non-bake oreo cheesecake, as I would have a leftover of 750ml of whipping cream. Ah.. sorry for sidetracking~

Back to the recipe~ Here's the successful product. I have made several attempts before achieving the creamy texture. Be careful not to get the scrampled-egg-like texture.


Carbonara Penne

And here's how to do it:

Ingredients needed

  • Penne
  • Boiling Water
  • 1 cup of Whipping Cream
  • 1/3 cup of Parmesan Cheese
  • A pinch of salt
  • A pinch of pepper
  • Onion Slices
  • Mushroom Slices
  • Bacon Slices (thick cut & thin cut)
  • Cooking oil

TIP
You can replace penne with any pasta of your choice.

Method

Bacon
1. Fry the bacon slices.

2. Fry the thick cut bacon slices until they turn crispy on the sides. These will be stir-fried with the other ingredients.

3. Fry the thin cut bacon slices until they turn very crispy. This will be for the toppings.

Penne
1. Add a pinch of salt and a few drops of cooking oil into the boiling water.

2. Add penne to the boiling mixture and cook for the duration that is stated on the pasta packaging. Stir at times to prevent the penne from sticking to each other.

3. Drain the penne from the mixture.

Carbonara Sauce
1. Mix the whipping cream, Parmesan cheese, salt and pepper together.

Carbonara Penne
1. Add cooking oil to the frying pan.

TIP
Though maybe not as healthy, but nevertheless very delicious... try to replace the cooking oil here with 2 to 3 tablespoons of the oil retrieved from frying the bacon slices.

2. Add onion slices and fry them till slightly brown.

3. Add mushroom slices and bacon slices (thick cut) and stir-fry them.

4. Add penne and stir-fry the mixture.

5. Add the cabonara sauce mixture, and stir-fry at low heat.

TIP
Here's the most tricky part. Remember to use low heat. And stir continuously to prevent the mixture from clumping together. Else it will end up looking like scrambled eggs instead.

6. Serve, and topped the carbonara penne with thin cut bacon slides.

And there you go~ Carbonara Penne made from scratch.


How to make Soya Sauce Chicken Wings

My parents have been lamenting that I seemed to cook primarily Japanese dishes, though they prefer Chinese cuisine. So, I heed their advice and decided to check out the recipe collection at the National Library. And I got my hands on this book 《懒人最爱:电饭煲美食》. This title really speaks to me as I really like fuss-free, simple recipes. Rice cooker dishes are great, as we normally just have to prepare the marination or the sauce mixture, and then we just need to dump all our ingredients in the rice cooker, and viola~ the dish is done. And of course, without compromising on the taste too.

The recipe I picked from the book is 香菇焖鸡翅 Soya Sauce Chicken. I varied the recipe to achieve the taste that the family likes: Juicy, savory, but not too salty.

And here's the eventual product:


And how I achieve it:

Ingredients needed

  • 10 Chicken Mid Joint Wings
  • Onion slices
  • Ginger Slices
  • Mushroom Slices
  • 45ml of Chinese Rice Wine
  • 30ml of Dark Soya Sauce
  • 15ml of Light Soya Sauce
  • 50ml of Water (for soaking)
  • 50ml of Water (for cooking)
  • Pepper (to taste)
  • Sugar (to taste)
  • Sesame Oil
  • Cooking oil

TIP
If you can replace the chicken mid joint wings with winglets, that will be perfect. But of course, you will need to adjust the quantity of the wings to match the sauce mixture. Try not to use drumsticks/ drumlets though. They don't taste as good. And that's speaking from experience.

Method

1. Mix chinese rice wine, dark soya sauce, light soya sauce, 50ml of water, sesame oil, sugar and pepper together.

2. Soak the chicken mid joint wings in the mixture. Leave it in the refrigerator for at least an hour.

3. Add cooking oil and sesame oil to the rice cooker.

4. Add the ginger slices, onion slices and mushroom slices into the rice cooker.

5. Add the marinated chicken mid joint wings into the rice cooker.

6. Add the marination mixture into the rice cooker.

7. Add 50ml of water into the rice cooker.

8. Cook for about 30 minutes.

9. Serve~

There you go... Isn't it very simple and easy~

Dec 13, 2014

How to make Ebi No Umani 日本版的醉虾

Thanks to JETAA Singapore, I have learnt 3 new Japanese recipes (^_^). Thanks, Keiko-san, for teaching us these recipes!

This year's cooking workshop focuses on osechi, which is a set of special dishes that Japanese make to welcome the New Year. There are many types of osechi, and for this workshop, we learnt 3: Kouhaku Namasu 紅白なます,Ebi No Umani 海老のうま煮 and Chukuzen Ni 筑前煮.

Ebi No Umani 海老のうま煮, somewhat reminds me of a Chinese dish, Drunken Prawns 醉虾, so that perks up my interest to learn how to make this.


I revised the given recipe, to make dashi soup from raw, instead of using powder.

Here's how to make the Japanese version of Drunken Prawns 日本版的醉虾:

Ingredients needed

  • 8 Prawns
  • 500ml of Water
  • 4cm by 3cm of Kelp
  • 6g of Bonito Flakes
  • Boiling water
  • 30ml of Sake/ Rice Wine (for soaking)
  • 50ml of Sake/ Rice Wine (for cooking)
  • 100ml of Mirin
  • 1 toothpick


Method

1. Cut the tips of the prawns' heads and tails slightly.

2. Using the toothpick, poke through the shell at the second or third segment of the prawns' bodies, and pull out the dark veins.

TIP
Compare and contrast the above deveining of prawns with the Chinese method. For the Chinese dishes, we will slit the back of the prawns using a knife and then pull out the dark veins.

3. Soak the prawns in 30ml of sake.

4. Add boiling water to the mixture, just enough to cover the prawns. Leave it for 10 minutes.

5. To make dashi soup, add kelp and bonito flakes to 500ml of water. Once it boils, and the mixture turns brownish, sieve out the kelp and bonito flakes to retrieve the dashi soup.

6. Add 100ml of mirin and 50ml of sake to the dashi soup. Stir well while cooking the mixture. Cook the mixture till boiling point.

7. Add the prawns into the above mixture. Cook for 2 minutes.

8. Serve the prawns dry.

TIP
This dish is meant to be served when cooled, so it would be good to make this dish first before others, so that it has time to cool down.

There you go, do you find any similarities and differences between Ebi No Umani and Drunken Prawns?

Hope you enjoy the Japanese version of Drunken Prawns as much as I do. (^^) Bon appetit~

Other recipes of homemade Japanese food which you may like to try:


Dec 11, 2014

How to make Teriyaki Salmon

This is an improvised recipe which I learnt in JETAA cooking class last year. The recipe was originally for the making of teriyaki chicken toppings for the teriyaki chicken pizza.

After several attempts to perfect the taste, here's the recipe for teriyaki salmon. I could proudly say this is one of my most confident dishes, at least, taste-wise. It is not easy to capture a beautiful shot though.


Ingredients needed


  • Salmon fillet with skin
  • Cooking oil


TIP
Give some cuts to the salmon fillet so that it will be cooked faster.

Teriyaki Sauce

  • 100ml of Mirin
  • 15ml of shouyu/ light soya sauce
  • 1 teaspoon of sugar


Method
1. Mix the ingredients for the sauce.

2. Add the salmon fillet into the mixture, and leave it in the refrigerator for at least 3 hours.

3. Add cooking oil and lightly pan-fry the salmon fillet (skin facing downwards).

4. Add the mixture that the salmon fillet is marinated in, and sauteed till cooked.

TIP
Be careful not to overcook the salmon fillet.

5. Ready to serve~

There you go, a very simple recipe for teriyaki salmon.

Other recipes of homemade Japanese food which you may like to try:

Jun 13, 2014

Cafe Hopping in Malaysia ~ Cozy in the Rocket

Have you heard of "Amelie Cafe" in Penang? The hole in the kind type of cafe which oozes raw and rustic vibes.


Photo credit to Clauds Wu :)


The husband-and-wife team of "Amelie Cafe" has replaced "Amelie Cafe" with "Cozy in the Rocket", which is also in the neighbourhood.

Actually the encounter with "Amelie Cafe's" successor was purely by chance. 2 years later when I revisit Penang, I very much wanted to bring my parents to "Amelie Cafe", to show them her unique character. And of course, their desserts!

When we finally came to Lebuh Armenian, we were already tired, sweaty, and craving for some shelter. Exploring by foot in George Town during noon is no feat!

And I came across a cafe which reminds me of "Amelie Cafe". A little raw, with the handwritten signages, and yet cozy. However, "Cozy in the Rocket" is bigger, is air-conditioned, and ... the landmark plants decorating the shopfront are missing. Nevertheless, we went in...


Eh... the picture of the dog! I think I saw it before somewhere!

And it is.. it was in "Amelie Cafe", 2 years back:

Photo credit to Clauds Wu :)

But then I didn't know it was "Amelie Cafe's" successor yet. And I ordered a range of food for us - Mango and Passion Fruit juice, 100 plus canned drink, Aglio Oglio Spaghetti, Pork Spareribs Spaghetti and Coconut Panna Cotta. Everything costs us about RM90 odd. The pasta were a hit for my parents, though they are usually not keen on western cuisine. And the dessert Coconut Panna Cotta was a major hit amongst us.


Aglio Oglio Spaghetti: Bacon strips were still crispy. Yums!


Pork Spareribs Spaghetti: Very generous with their homemade bolognese sauce.


Coconut Panna Cotta: Truly 入口即化! Slurps!

If I knew "Cozy in the Rocket" was "Amelie Cafe's" successor, I would have made desserts my mains!

TIP
I went on a weekday afternoon, and it was only the husband-and-wife team on duty. One in the kitchen, one in the hall. So... be patient. Enjoy the air-con while waiting for your order :)

Oh ya... they have improved a lot on their toilet facilities as well. No longer was it dim and dark. It is now located out of the air-con premises, and has two cubicles, all clean, bright and cheery. :)

Location:
Cozy in the Rocket
262 & 264, Lebuh Pantai, George Town, Penang.


"Cozy in the Rocket" is easy to locate it as it is next to the street art lane, and there are many popup stalls along that street now. So.. go with the crowd :)

Opening Hours:
11am - 4pm, Closes on Mondays


Jun 3, 2014

How to make Zaru Soba

Another favourite for summer~ and for all of us living in tropical countries~ Zaru Soba. "Zaru Soba" is loosely translated as "Cold Soba noodles with dipping sauce".


It is a very simple dish, and you can prepare it under 30 minutes. (^-^) Here's how:

Ingredients needed

Soba

  • Soba (Quantity- as you like)
  • Sesame oil (for flavour)
  • Boiling water


Tsuyu/ Dipping Sauce

  • 250ml of water
  • 1.5 tablespoon of soya sauce/ shouyu
  • 1 tablespoon of sugar
  • 1.5 tablespoon of sake
  • 6g of bonito flakes
  • 1 piece of konbu (approx 7cm by 3cm)


Garnishing

  • Sliced seaweed
  • Sliced spring onion


Method

Soba

1. Add a few drops of sesame oil to the boiling water.

2. Boil the soba. Remember to stir them to prevent them for clumping together.

3. Drain away the water to retrieve the soba.

4. Run the soba under cold water to cool it.

Tsuyu/ Dipping Sauce

1. Add all the ingredients into a pot.

2. Boil them.

3. Drain away the bonito flakes and konbu.


Ready to serve

To serve

1. Add garnishing to the soba.

2. Dip soba into the tsuyu/ dipping sauce for taste, before eating.

Enjoy~

Other recipes of homemade Japanese food which you may like to try:

Jun 2, 2014

Cafe Hopping in Malaysia~ Humble Beginnings

Mille Crepe Cakes~ Have you seen one? Lots of work involved in making one, since it actually means a French cake with "a thousand" layers. I rarely see Mille Crepe Cakes being sold in Singapore. Otherwise, their prices are exorbitant, which deter me from buying. Mmm.. to me then, spending so much for many many layers of crepe doesn't seem justified.

But Humble Beginnings's Mille Crepe Cakes changed my mind... Here's why...


Humble Beginnings sell many varieties of Mille Cakes. On our short getaway to Johor Bahru yesterday, we tried French Bean flavour, Coffee flavour and Swiss Chocolate flavour. And my favourite is the French Bean Mille Cake. Mmmm.... *drools* just recalling the cake makes me drool~

I highly recommend it to all Vanilla lovers. The strong Vanilla flavour and fragrance lingers... It somehow reminds me of the Ben and Jerry's Vanilla ice-cream. Similar tint of vanilla flavour~

Each piece costs RM9.90, which is about SGD4 (considering current exchange rate of SGD1=RM2.50). Very affordable.

Tempted? Here's where to grab one... Oh.. unfortunately they don't have any branches locally yet. But from their website, they do deliveries to Singapore too. Pickup at Cathay Cineplexes and charged at SGD10 per location.

Well... if you have time to spare, why not head down to Johor Bahru. It's really close, as it is at City Square, just next to the Immigration Checkpoint. You wouldn't need transportation in Malaysia, just a few steps away after getting your passport stamped.


Humble Beginnings
J6-05, Level 6, City Square
Johor Bahru 80000
Johor, Malaysia

Oct 17, 2013

How to make Hiyashi Chuuka Soba (Cold Soba with Toppings)

冷やし中華らめん Hiyashi Chuuka Ramen is a common dish during summer in Japan. One of my fondest memories of Japan’s summer during my JET years was enjoying my cold Hiyashi Chuuka Ramen from the nearest convenience store from the school. Refreshing!

Though it is not uncommon to find cold soba 冷やし蕎麦 (Hiyashi Soba), but冷やし中華らめん is rather difficult to find in Singapore restaurants. Interestingly, one would think since Singapore is a tropical country, with summer all-year round, we should have abundance of cold dishes like cold soba, cold udon, etc. However, we don’t. The more predominant one is probably cold soba, a concept we imported from Japan. Not so much for the rest. I think Japan’s array of cold dishes is more varied than Singapore’s. Mmm.. I think we, Singaporeans, probably prefer our desserts chilled than main course chilled. :P

Nevertheless, do give Hiyashi Chuuka Ramen a try on a hot summer day. You might change your mind about chilled main course.

Giving it a slightly different twist, I prepared Hiyashi Chuuka Soba 冷やし中華蕎麦 instead for my lunch bento. Using soba, which is more easily available, instead of ramen.  It’s a very easy dish, just a bit more work, especially if you like to add more colours to the soba.


Ingredients needed

Soba

  • Soba
  • Sesame oil
  • A pinch of salt
  • 3 tablespoons of Roasted Sesame Dressing


TIP
For the Roasted Sesame Dressing, I uses Mizkan's Kinogomadare 金のごまだれ.

Toppings

  • Sliced carrots
  • Sliced Japanese cucumbers
  • Crab meat stick
  • Sliced ham
  • Corn kernels
  • An egg


Garnishing

  • Pork floss
  • Sliced seaweed


Method

1. First, prepare the soba as we need to cool it. Boil soba in hot water with a pinch of salt.

2. Once it is boiled, run it under cold water and mix the soba with some sesame oil, so that they will not stick.

3. Boil the sliced carrots and corn kernels. Leave them to cool when cooked.

4. Boil the crab meat stick and sliced them when cooked. Leave them to cool.

5. Fry sliced ham. Leave them to cool when cooked.

6. Mix the egg white and egg yolk to make omelette. Slice the omelette when ready. Leave to cool.

7. Add the soba in the serving boil/ plate. Add 3 tablespoons of roasted sesame dressing to the soba.

8. Add the rest of the toppings: Cucumber, carrots, corn, sliced ham, omelette and crab meat, side by side on the soba.

9. Add garnishing like pork floss and seaweed.

10. Serve with love~ Remember to mix the soba with sesame dressing and the toppings well before eating.

TIP
According to your preference, you can change the choice of toppings. I usually pick a range that has different colours to make the dish more appetizing. I tried adding edamame, too.


Have a cool summer with 冷やし中華蕎麦!


Other recipes of homemade Japanese food which you may like to try:

Sep 1, 2013

Finding Japan in Singapore ~ Makan trail ~ Udon 2

You might already know, the first udon stall that brought me memories of Japan in Singapore is already closed down. (=_=)

But not to worry, I have spotted the second one. This one came with a big splash, it even have a news coverage on Channel News Asia:


Brought from the land of udon, Kagawa Prefecture, Tamoya is famous for her sanuki udon, characterised by its squarish shape with flattened sides.

Just like any other udon stall in Japan, first you choose how you want your udon to be done (with soup? which type- kake (golden broth) or bukkake (thicker shoyu soup)? curry? hot or cold?)

Then pick a size. Regular? Large?

Next choose the sides to go with your udon. Mostly deep-fried though. They now offer kitsune (sweet beancurd skin) too, as a rare non-deep-fried item. You can have an onigiri too, if you're really hungry.

TIP

Go for their tempura prawn. Worth the $2.50. And if you order an additional egg, do note it is a raw egg, not a half boiled one that you usually get in Japan.

Now go for the free toppings and sides like extra soup, tempura sauce, more crunchy tempura bits, cut spring onions, even grated ginger or tapioca for your sauce.


TIP

Go for the Chinatown Point outlet, they have way more free toppings. (omg.. even umeboshi (preserved plum)?!)

And tada... my kake udon... All these for just $8.90?! I could have added more toppings if I wanted.


Trying out other toppings on another occasion:


Tamoya now has 2 outlets in Singapore, one in Liang Court and the other newly opened one in Chinatown Point. I've tried both, and both at non-peak hours. At 5 plus or 6 in the evening. Definitely before the dinner crowd. Because it is during non-peak hours, the deep-fried items tend to lose its crispyness and that is quite evident in the Liang Court branch. Hence, during non-peak hours, it is best to order tempura prawns, which they will deep-fry fresh for you.

Personally, I like my kake broth. Just the right tinge of saltiness and dashi.

There you go, authentic udon experience in Singapore.

Tamoya

133 New Bridge Road
Chinatown Point SC B1#48-49


View Larger Map

177 River Valley Road
Liang Court SC #01-32
Singapore 179030


View Larger Map

Other Finding Japan in Singapore recommendations:

Jun 27, 2013

How to make Agedashi Tofu

Agedashi Tofu 揚げだし豆腐 - one of the very common dishes in a Japanese meal. This seemingly simple dish, is actually, not simple at all! Probably coupled with my lousy skills in deep frying, it took me several attempts to get it right.

Tada~ I'm now proud to present to you my successful attempt of the Agedashi Tofu~


Now, here's how to re-create it:

First, let's make the sauce that accompanies the Agedashi Tofu.

Ingredients needed

  • 250ml of Water
  • 6g of Bonito Flakes
  • 3cm by 5cm Kelp 昆布 (konbu)
  • 2 tablespoons of Rice Wine 白米酒 / Sake
  • 2 tablespoons of Light Soya Sauce / Shouyu 醤油
  • 1 tablespoon of Sugar


TIP
You might have noticed, I have replaced some Japanese ingredients with Chinese ingredients, like rice wine replacing sake, and light soya sauce replacing shouyu. Don't worry, the sauce still taste as good. :)

Method

1. Add all ingredients together into a pot.

2. Heat the mixture, until it boils.

3. Set it aside, while we continue to make the Agedashi Tofu.


Now for the main character~ the tofu~

Ingredients needed

  • 1/2 cup of Tempura Flour
  • 150ml of Ice Water
  • Some excess Tempura Flour
  • Cut Spring Onion
  • Seaweed slices
  • Chinese Tofu


TIP
It looks like silken tofu, but be careful, look for the tofu that states "suitable for frying". It usually has a picture of the Agedashi Tofu on it as well. This is because we need firmer tofu to deep fry.

Method

1. Using kitchen towels, remove the excess moisture from the tofu.

2. Mix 1/2 cup of tempura flour and 150ml of ice water to form the batter.

TIP
The temperature difference between the batter and the oil used for deep-frying will maintain the crispiness of the agadashi tofu.

3. Pour some tempura flour on a plate for initial coating.

4. Cut the tofu into cubes.

TIP
For beginners, it is easier to manage, if the tofu is cut into smaller cubes. It helps in the coating and deep frying later.

5. Coat the tofu cube with loose tempura flour. Just roll it along the plate of flour.

6. Dip the tofu cube into the batter and coat it.

7. Heat the oil. Ensure it is hot enough for deep frying. You can test the temperature by using some batter.

8. Deep fry the tofu cubes until golden brown.

9. Use kitchen towels to soak away the excess oil.

10. Add the tofu cubes into the bowl of sauce prepared earlier.

11. Serve with garnishings of cut spring onion and seaweed slices.

TIP
If you want a truly authentic Japanese experience, you can serve with grated daikon/ white radish and grated ginger. These can be mixed into the sauce for taste.

And there you have it, Agedashi Tofu.
If QQ can do it, so can you!

P.S: If you prefer chilled tofu dishes, you can try this: Chilled Tofu Topped with Spring Onion, Preserved Turnips and Century Egg, instead. :)

Other recipes of homemade Japanese food which you may like to try:


Jun 23, 2013

The Eating Guide in Macau

First time in Macau, and not sure what to do during the short 2-day-1-night getaway? Why not have a mini gourmet tour in the midst of your shopping at Macau?

Here's a compilation of my hits with Macau's food galore:

黄枝记


黄枝记 is rather famous in Macau, with quite a number of branches. From the web reviews, she is famous for her wanton mee and pork chop bun.


Personally, I like their wanton, but not their mee. It's the very thin and kind of tough type. Guess we, Singaporeans, are not used to their wanton mee.


I like their Pork Chop Bun. The bun is soft and crispy on the outside. And they aren't stingy with the pork chop. It is literally a big piece, like what I would have if I ordered Pork Chop in local kopitiam.

How to get there?
I went to the branch at Senado Square, the easiest to locate, and also the most convenient since it is at the tourist spot. It is near the fountain. You wouldn't miss the gold and yellow decor.

TIP
To get to Senado Square, you can take the free shuttle bus from Galaxy Hotel and alight at 新马路. The bus stop is opposite Macau Square. Just walk about 10 - 15 minutes and you will reach Senado Square. You can take the return bus along the same street as where you have alighted. The Galaxy Hotel staff are very sweet. On rainy days, they station themselves at the bus stops with umbrellas to shelter us as we board and alight the bus!


Lord Stow's Bakery

What's Macau without Portuguese Egg Tarts, right?


You definitely have to try them. They are the best Portuguese Egg Tarts I have ever tasted. Sweet, yet not too sweet; rich, yet not too rich. And certainly very fragrant. I liked the balance.

You can buy a box, which is about half a dozen. It costs slightly less than MOP 50 for a box.

Best to eat them fresh from the oven, like all pastries. If you leave them overnight as breakfast, like me, they became sweeter. And then it tastes, just like the ones in Singapore bakeries. Not special anymore.

How to get there?
Again, there are a few branches, but the easiest to locate is at Venetian Hotel. Most hotels have free shuttle buses to Venetian Hotel, so do catch a ride on them. Lord Stow's Bakery is located on the Mask Street in the shopping complex of Venetian Hotel.


View Larger Map

TIP
Don't underestimate the shopping complex in Venetian Hotel. It's HUGE! It took us quite a while to find Lord Stow's Bakery. Be armed with their map before you start searching. As a guide, the bakery is located near the man-made rivers/ canals.

The Eight 8

Enough of snacking? Now's for the main course! Have a star-studded dim sum lunch at The Eight at Grand Lisboa. This restaurant is awarded with 2 Michelin stars. :)

Some of the must try:

霸王淡水鮮蝦金魚餃


春风得意肠粉


脆香叉烧包


For more juicy details, check out my full review on my dining experience at Eight.

What I like best about Eight are the finely sculpted, delicious dim sum (some are so adorable that I can't bear to eat them), their service and the affordable pricing. We had a very full dim sum lunch, and yet it only cost as much as a typical lunch/ dinner at a franchised Chinese restaurant in Singapore.

How to get there?
The Eight 8
Grand Lisboa, Level 2
南灣葡京路新葡京酒店2樓


View Larger Map

Have fun exploring the eateries at Macau!

Michelin Star-Studded ~ The Eight at Grand Lisboa (Macau)

Finally! It's my turn to try a Michelin-star-awarded restaurant. Ever since I have heard about the gourmet indulgences my friends have when they dine at Michelin-star-awarded restaurants in Europe, I have been looking forward to my own gourmet indulgence. But cost has always been a factor hindering it.

Unknowingly, for this year's annual family trip, I stumbled upon The Eight, a 2-Michelin-star restaurant, during my course of research on Macau. And... the lunch menu, surprisingly, was within budget~ Yeah!

I'm so glad for my chance encounter... It is definitely the best start to my makan adventure at Michelin-star-awarded restaurants.


Located at Grand Lisboa, one of the iconic buildings in Macau, the restaurant had a very posh entrance. As we were led into the restaurant, projections of goldfish swam along with us as we entered the dining area.

TIP
Do note that they have a dress code. The dress code is smart casual. No slipper, no T-shirts and no sandals.

Lunch starts from 11.30am. Once the restaurant opened at 11.30am, diners started to stroll in. Luckily, I have made reservation! Soon, it was fully filled with customers, yum-cha-ing away.

Their waitress crew has different nationalities. Hence, do not worry if you are like me, extremely bad at Cantonese. They have someone who is a native speaker in English to attend to us.

TIP
Make an online reservation first via their website. On the website, it is stated that they recommend us to reserve two weeks in advance. I reserved mine one month in advance! :P

The first dish served was the appetizer, made of abalone and beef. It's on the house~ Everyone has a set, by the way. :)


TIP
Unfortunately, even if you don't take beef, you can't change the dish, since it's free.

Now here's the dim sum galore you have been waiting for~ some of them are really so cute, that it seems a pity to eat them...


霸王淡水鮮蝦金魚餃 Goldfish shaped prawn dumplings


春风得意肠粉

It is very long! And crunchy on the inside. Very different from our local Chee Cheong Fan.


脆香叉烧包

There are two options of ordering the Chau Siew Bao, you can have it steamed or pan-fried. This is the pan-fried one, which is recommended by the waitress. Only the bottom is pan-fried after it is steamed. The combination is wonderful! This is my mum's favourite.


原隻乳豬焗飯

Baked rice in roast suckling piglet. This is a recommended dish by reviewers on Openrice, hence I gave it a try too. We had to wait 45 minutes before it was ready. However, it was quite disappointing. I found it too oily. Perhaps it does not suit the tastebuds of non-locals.

Now's dessert time~


燕液雪人

Made up of two buns - red-bean flavoured and bird nest flavoured. Probably the most kawaii dessert~


白玉无花小凤酥配雪梨雪糕 Pear flavoured sherbet and pastry


鴛鴦金魚凍 Mango and almond flavoured jelly goldfishes


黑白芝麻布丁配芝麻雪糕

Black and White sesame pudding with sesame ice-cream. What's special is the ice-cream, which is mixed with real sesame seeds.

Finally it ended with Portuguese egg tarts and a very sweet milk tea. Mmm.. for the egg tarts, I still think Lord Stow's Bakery has the best Portuguese egg tarts. But the egg tarts and milk tea are on the house again, so.. no complaints. :P


Overall, besides the mouthwatering, kawaii sculpted dim sum, I also liked the service there. The timing which they serve the food is timed just nice. I've finished this dish, soon after some small talk, another one is served, and another. A continuous, yet right tempo, which keeps the dining momentum going. Just nice, which did not made me feel uncomfortable, like they are rushing me.

Other aspect of the service which I liked is their initiative. Seeing that there are four of us, they suggested to changed all dim sum presentations to fours instead of threes.

Altogether, 4 of we ate 12 dishes, but we only paid about MOP 810 (about S$130). I had expected about twice the cost, given the exquisite food and level of service we have received.

How to get there?
The Eight 8
Grand Lisboa, Level 2
南灣葡京路新葡京酒店2樓
If you go by cab, ask the driver to take you to 新葡京. (They remember Chinese names better.)


View Larger Map

The Eight is definitely the restaurant I will re-visit again when I am at Macau.

Just looking through Openrice reviews makes me crave for the other dim sum dishes which I have yet to try...

*drools*